
In Microsoft Dynamics 365 Business Central, a dimension can be created by a user to help perform analysis on various documents. According to Microsoft, “dimensions are attributes and values that categorize entries so you can track and analyze them.” This helps organize data for sorting and analysis, without creating a bunch of separate GL accounts.
Users can add as many dimensions as necessary. Using Microsoft’s example from the above blog, a single sales entry can include:
- The account the item sale was posted to
- Where the item was sold
- Who sold it
- The kind of customer who bought it
- And more!
After you’ve set up your dimensions in Dynamics 365 Business Central, you can get creative and completely personalize how you want your data to display. Below we have two great tips for personalizing Dynamics 365 Business Central with dimensions: displaying dimensions in financial statements and displaying dimensions on the Preview Posting window.
Display dimensions in financial statements (in either columns or rows)
Dimensions can easily be added to the account schedule rows and columns for financial statement reporting. The following illustrates the steps for both options:
Report with a dimension in each column:
Go to Finance > Account Schedules.
Click on the Process button, then choose Edit Column Layout Setup.

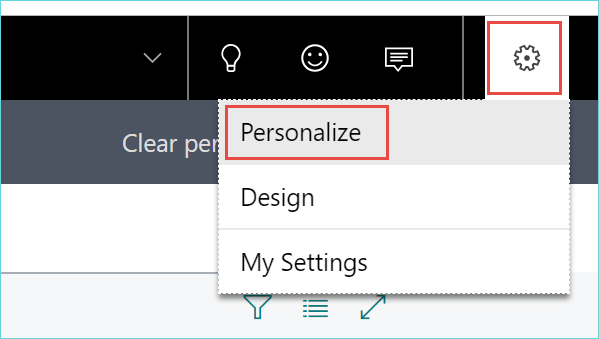
Click the settings icon and choose Personalize > More.
Click to “+” field.

Drag and drop the field for the dimension that you would like to add. In my example, the dimension is labeled Department so the field is called “Department Code Totaling.”
Click Done.
The columns can now be filtered by the dimension code.
In this example, I set up a column for each department and then a column for the total:

Now, when I generate the report, it displays the departments in the columns:

Report with a dimension in each row:
The same process can be used to restrict rows to specific departments.
I added the same column (Department Code Totaling) to the Account Schedule window. Then I was able to create a quick Gross Profit report with period- and year-to-date breakouts by department:


How to improve the G/L Preview Posting window with dimensions
A slight personalization can make the preview posting process much easier with managing dimensions.
This invoice has the PROD and SALES department code dimensions assigned to different line items:

To make it easier during the G/L entry preview posting, the dimension can be quickly added to this window.
First, go to Posting > Preview Posting, and click the link for G/L Entry:

Click the settings icon and choose Personalize > More.

Click the “+” field.

Then, drag and drop the dimension (Department Code) to the preferred location on the window and click Done.

The Department code is now visible for each G/L entry related to the invoice:

This will now apply to the G/L Entries Preview window from anywhere within Dynamics 365 (e.g. previewing general journals, purchase invoices, etc.).
This is just a few of the ways you can customize your Dynamics environment to work for you and your team. For more tips on becoming a Business Central master, visit our blog and subscribe to our Dynamics 365 updates.