
The icing on the cake of a great ERP system lies in its customizability. APIs allow users to connect Microsoft Dynamics 365 Business Central to external services, eliminating the need for constant back-and-forth between systems. With Dynamics 365 Business Central, users are able to connect Web Services using a point-to-point connection between their ERP and a 3rd-party solution quickly and easily.
Microsoft has plenty of great documentation out there, but we’ve tried and tested the steps, and we’ve found the workflow that works best for us. Most people seem to start with asking, “how do I set up the endpoints?” But hold your horses; there are a few steps before that.
First Step: Setting Up User Access to BC’s API
This is the most important first step, and one that many people miss initially; you need to establish user access to Business Central’s API.
First, navigate to the Users screen, and select to whom you’d like to give permission. Then, a couple things need to happen.
Step 1a: Define Web Service Access Key
Be sure that the Web Service Access Key is defined. Then, click on the ellipses next to the key, and mark the “Key Never Expires” checkbox.
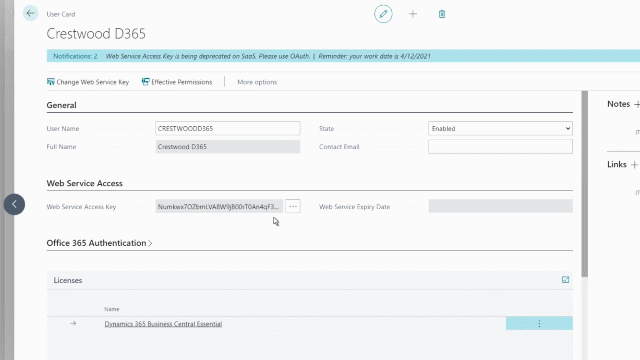
This is now the “password” that the established user will use to log into Business Central APIs later.

Step 1b: Assign “Extension Management” Permissions
The next step is to scroll down to the User Groups window. Even though the user is already set up as a Premium user with full access, they ALSO need to be assigned “Extension Management.” If the user is not added to that group, they cannot access the API.

That permission group is what enables the user to make connections from Business Central to outside services.
Step Two: Enable Web Services
The previous step covers the importance of setting up a user properly to access APIs. Now, it’s time to actually enable the Web Services you’ll be using. Whatever services you’re looking to connect, the next step is obtaining access to those endpoints.
Step 2a: Publish Endpoint
Navigate to the list of Web Services using the search bar. Here you will find all the existing tables/endpoints. Many will be unpublished by default for security reasons. They need to be published for you to access them (highlighted in the column below).

Additionally, if you have multiple tenants, you’ll want to check the box in the “All Tenants” column to the left of the “Published” column.
Tip: New endpoints can be created by clicking the + New option in the menu bar and selecting the type of object (Codeunit, Page, or Query) that will be exposed as an endpoint. (Usually, we will only be pulling data from a page or a query, but some extensions will expose data via codeunits. Verify with your Microsoft partner or extension vendor for specific details.)
Step 2b: Select URL Type and Copy
The tool you’re connecting to will have certain requirements for the URL data type, but in general always use the OData v4 URL. Be certain to copy the entirety of the endpoint URL as this will be used to connect to Business Central.
Tip: It’s easiest to copy the URL if you open the list in Excel first.
Next Steps
After you’ve followed this tutorial, you will have your user set up, your password ready (i.e. your non-expiring Web access key set), and your URL for whatever end points you need. Now you’re ready to connect to all the external systems that you’d like, whether it’s Scribe, Excel, SmartConnect, or even a custom development solution.
Connecting to Excel
The below screen capture is from Excel and shows the steps required to connect to the G/L Entries endpoint. This is just an example, but connecting to the other endpoints will follow a similar pattern.
Step 1: Connect to OData Feed. Select the Advanced option.

After pasting the URL, click OK.
Step 2: Enter the credentials.
In the below window, click Basic in the left menu pane.

Enter the user and Web access key, applying to the base (first) URL in the drop-down list.

Press Connect.
Step 3: Load the data.
At this point, you have a number of options to load the data into the worksheet or into a pivot table, or to transform the data.

Be sure to subscribe to our blog for more tips like this. For adding extra power in your workflow, join us on May 5th for an Intro to PowerPlatform.