
Recently, I was assigned a project to format one of our product training manuals. Being a desktop publisher for over 20 years, my first initial thought was: Oh my! Who created this mess? The table of contents was broken, fonts were mismanaged, and the images were all over the place, not to mention the page numbers were off. Just a hot mess!
Let’s take a closer look at using Styles in Microsoft Word. Not only will this help with a professional and consistent look and feel in your document, if you use them correctly, you can build the Table of Contents from it too.
Before we begin learning Styles, did you know to insert a Table of Contents into your document you need to apply Styles throughout? See The Easy Way to Build a Table of Contents in Microsoft Word to set up a Table of Contents.
What is a Style?
Styles are a set of font attributes you apply to your text to not only highlight different sections, but to keep your document looking consistent throughout. Styles are applied to headings, titles, subtitles, quotes, lists, and more. You can create your own Style or modify existing built-in Styles by font type, size, color, underlined, etc.
Let’s Begin:
The Styles menu is located at the top of your Home Ribbon Menu bar. Clicking on the down arrow button will open the Styles menu fully to see what is currently available, create a new style, or clear formatting.


Before you begin editing your document, I suggest you Select All (Ctr A) and then select Clear Formatting. This will help in the long run when working with larger files.
The tool Apply Styles at the bottom of the list will open a floating menu so that you can quickly apply or modify styles as you move through your document.

You can also access the Styles menu by clicking on the tiny box with an arrow in it to bring up an additional floating menu. This menu bar can be expanded to show all styles for faster access.


You can also find Styles when you select text. A thin floating menu bar will appear when text is selected. Click Styles to access your options.

How Do I Apply a Style to My Text?
To apply a built-in Style to your text, simply highlight or select your text, then click on the Style you wish to apply. You will see by the image below, that after I selected my text, I applied the Heading 1 Style. The Style applied increased the text size and color. It is that simple.

How Do I Modify an Existing Style?
To modify an existing Style, right click on the style you wish to modify and then select Modify.

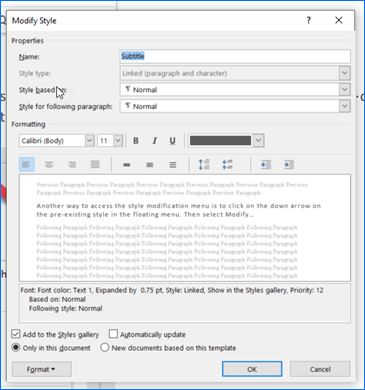
Another way to access the style modification menu is to click on the down arrow on the pre-existing style in the floating menu. Then select Modify…

When you have selected the Style you want to Modify, another dialog box will appear with many options. You can give your Style a new name, base it off a current Style, or paragraph, you can change the font type, size, color, justification, or indentation. Once you have configured the attributes of the style you wish to create, make sure to “Add to the Styles gallery” is check off, and if you want your document automatically updated with that new style, click the Automatically update feature. Then press OK. Your new style will appear in the menu as a selection.
Note: You can save this style by clicking on the “New Documents based on this template” to keep this Style for other documents.
How Do I Create a New Style?
First, follow the same steps listed above to access the Styles Menu. Then click “Create a Style” in the menu bar.

Next, name your style. Then click Modify.
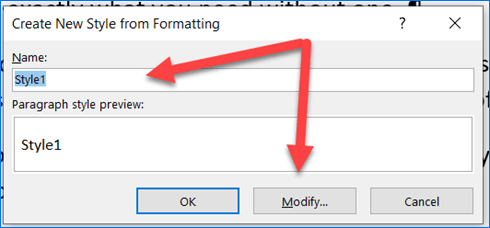
Then, modify your Style to your preferences and then click OK.

And viola, you created your own Style. I hope this helps beautify your documents making them more professional looking for your team and clients. For more Microsoft Office 365 Tips & Tricks subscribe to our Blog.