
Back in November 2020, I wrote a blog on how to Clean Up Your Microsoft Outlook Inbox by Creating Rules. Today, we will cover how to forward your emails in Outlook.
Why would I want to forward my emails you ask? You may want to redirect emails to other email accounts to avoid missing important documents while on the run or in business meetings. You may be going on vacation or sick and want other team members to respond in your absence. You may simply want your team to be knowledgeable of upcoming events or projects you signed up for. Whatever the reason, you do not want to risk losing out or not seeing something that is important.
In this blog, I will show you step-by-step procedures to set up your Outlook email to forward incoming emails to your recipient preference.
Step 1
To get started, we will follow the same steps written in the previous blog (link above) by right-clicking on the email message you want to forward. Then click on the Rules menu item, then Create Rule…

Step 2
Once you have selected Create Rule… another dialog box will appear. Click and select the first option From… (note, the email you want forwarded will be displayed here). In my sample, it is Microsoft Store. We will skip all other options and move directly on to click the Advanced Options… button.

Step 3
Next, we will set the conditions of what we want the email received to do. Since we are forwarding the Microsoft Store email, I want to make sure that email is selected as one of the conditions as seen in the below screen shot. In Step 2: we will need to set up the rule of what happens after the message arrives in my inbox. Click the Next button.

Step 4
After you have clicked Next, options will appear asking what you want to do with this message. As demonstrated in the previous Rules blog, you can have your message moved to another folder, or assign it a category, whatever the case may be, this is where you will select the rule for that condition. Since we are simply forwarding emails today, we will select Forward it to people or public folder. In Step 2, your rule description will be displayed. Next, click on the link People or Public Group.

Step 5
Once you click on the link People or Public Group you will need to select the recipients you want to receive the email. I have selected my colleague Amber (she loves being my guinea pig when I write blog posts).

Step 6
Once you hit OK, you will see all the conditions you set for that email displayed in the Step 2 section. Click Next.

Step 7
Once you have clicked Next, another set of conditions are displayed that will ask if you have any exceptions to that rule you created. Since we do not have any other conditions to set, I’m going to go ahead and hit the Next button to continue setting up the email forward rule.

Step 8
Lastly, to finish up the rule setup, you may want to give it a name. Completely optional. And in Step 2, you want to make sure you turn on this rule. You can also set this rule to run on previous messages in your inbox, but note, with that setting you are asking Outlook to take every single email from Microsoft Store (or your email) sent to your inbox to be forwarded to your selected recipient’s inbox. It is important to be mindful of how many emails that will entail that will go to the recipient’s inbox.
Once you click to turn on this rule, review the rule description in Step 3, then click Finish, then voila, your messages will be forwarded. It is that simple.

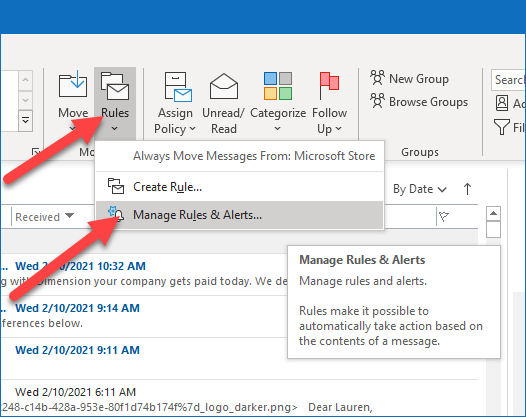
Now, if you want to make changes to the rule, such as turn it off or delete it, you will need to go back to your ribbon bar, and select Rules, then Manage Rules & Alerts.
Locate and select the rule you want to remove, single click on it then click the Delete button. Microsoft will verify your action, click Yes, then click Apply. It is that simple.

I hope this tip makes it easy for you to set up forwarding emails in Microsoft Outlook. For more tips and tricks visit and subscribe to our blog.