
In my previous blog, we talked about all the settings in the Adjust section under the Picture Format ribbon menu. I showed you how to remove the background of an image, adjust the brightness/contrast, change colors, artistic effects, and more. In this blog, we will explore the next section of the Picture Format tool bar and cover all the settings in Picture Styles.
Let’s get started
First, you need to add your photo to the document. Click the Insert tab at the top of your ribbon menu and select Picture then locate the image you would like to include from your local device or choose from Microsoft’s gallery. See How to Add and Format Text Around and Image for help.
Picture Styles
With your image selected, click the arrow down to select a Style. There are several types of image effects to sample. Try them all!
Instantly create an effect, like Relaxed Perspective with a white border.
Picture Border
You can change the border around your image with the Picture Border tool. Change the color, the weight, and style or use dashes to bring more attention to the image. You can also use the right-hand side Format Picture tools to work with the styles. You will have to play with this section to see what you like and what fits with the message you want to send to the reader.
Remember from our previous blog, if you do not like the results of your edited photo, you can always go back to the Adjust section and Revert your photo back to its original image.
Picture Effects
In this section, you will find tools to enhance your images. The next seven images will show you the tool and what it can do to your images. Again, you will have to play with all these tools to find the best look for your story.
Preset
There are several different Preset effects you can add to your image, try them all out.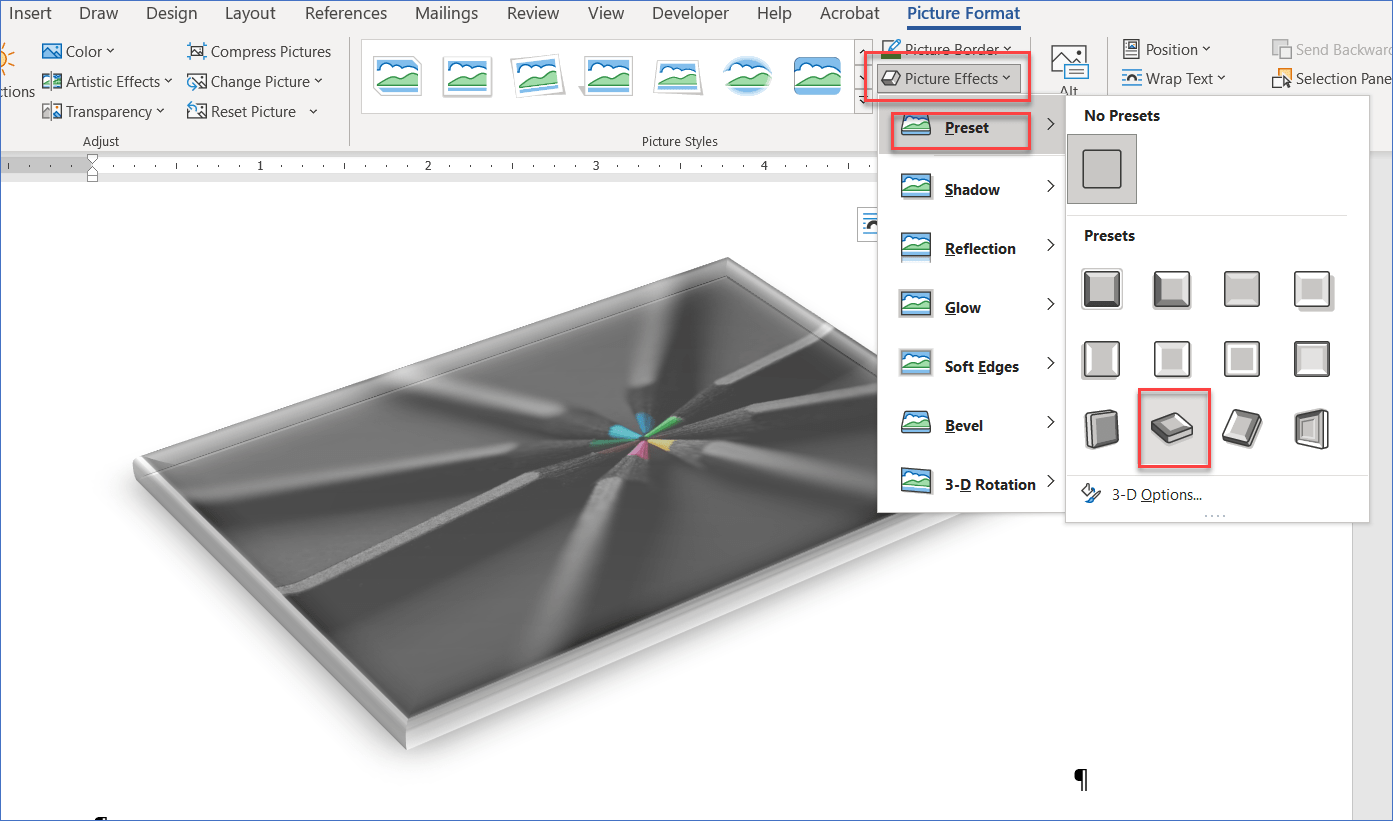
Shadow
You can place a Drop Shadow around your image to make it stand off the page. You can add inner shadows as well as perspective shadows.
Reflection
In this next image, I applied a picture style and added a reflection of the image.
Glow
In this next image, I applied the glow effect to the image. You can select from any glow color you perfer. 
Soft Edges
Apply a Soft Edge or feather to your image.
Bevel
I use bevel to create downloadable buttons then set up a URL, so the reader can view more, or download something.
3D Rotation
Show some perspective with 3D Rotation.
Speaking of 3D, Microsoft Word gives you access to high-quality content from the Stock 3D Model library. Go back to the Insert Tab in the menu ribbon and select 3D Models, then click on Stock 3D Models and search for your favorite image.


3D Stock allows you to rotate your image to create the 3D effect you desire. Simply click and drag the rotation handle to the desired position.
Picture Layout
Picture Layout is another way to demonstrate flow charts and other text and images you would like to highlight in your document. This is a complex topic for another blog day. Feel free to play around in this section to build organizational charts.

Alt Text
I covered this in another blog, Automatic Alt Text for Images in Microsoft Word last year. As a quick recap, Alt Text or Alternative Descriptions are written copy that describes the image. This text also helps screen-reading tools describe images to visually impaired readers. It will appear in place of an image in case the image does not load and it allows search engines to better rank your website.

That concludes the Picture Styles section in the Picture Format tool bar. Stay tuned, in my next blog, we will cover the Arrange section in the Picture Format menu. For more tips and tricks for Microsoft Office 365 visit and subscribe to our blog.